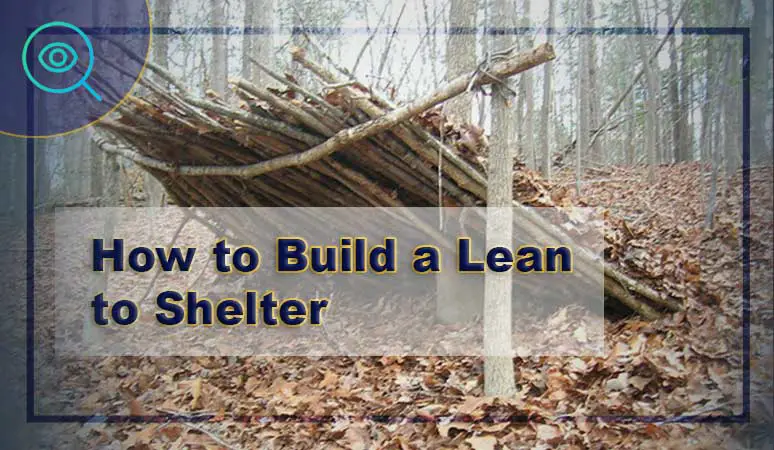
From tons of survival TV shows to some classic survive related books, lean-to shelter is a common topic that gets to be seen almost everywhere. The setting is usually a super hit when you come across a reasonable situation to use it.
To construct a lean-to shelter for yourself, there are definitely some key considerations, steps, and tips to know about. And to make you aware of all those ins and outs, let’s talk deeply about how to build a lean-to shelter.
Here’s the Whole Thing on How to Build a Lean to Shelter.
Usually, such tiny structures don’t need permission to start with. However, you should still check in your locality perhaps there’re related restrictions. Also, there are more than a few methods to talk about when it comes to building such structures.
There’s a method for one tree and low hanging branch. And also, there’s a way for two trees involved construction. Let’s talk about the more probable to be a useful method which is the latter one.
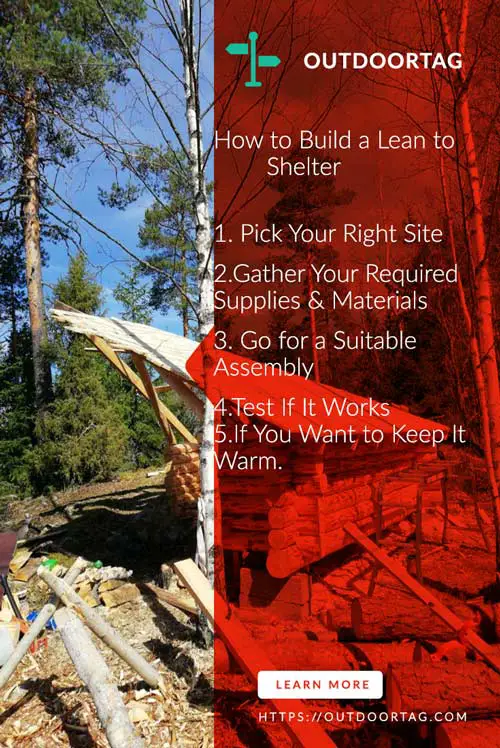
1. Pick Your Right Site.
You need to figure out an ideal site for building the structure. Usually, it’s best to stick somewhere close to water and wood resources. Also, make sure it’s not a place that involves putting you in danger. Such as falling branches or a strong wind taking over.
Now you need to find two trees that come with a gap between. The gap needs to be equal to your entire body length. If that’s hard to find, then go for trees that have at least four feet of distance.
You also want space behind the trees to comfortably lay down. You should be able to lay down with your feet at the back of this structure while keeping head on front. Also, you should face the lean-to in a direction that is against wind. So that you don’t get blown out. You can simply close your eyes and feel the wind to determine its direction. The flow of water or a direction flag can also be helpful signs here.
2. Gather Your Required Supplies & Materials.
You need a solid piece of six-inch wood and also a diagonal pole. This is for your frame. The piece needs to protrude at sides of trees. In total, you’ll require around five to seven poles here. The diagonal poles need to be thicker than any pole you add on back area. Just make sure the poles are long enough and also sturdy. Also, you need to use a few pine boughs if there’s no tarp in your lean-to shelter’s roof.
You need to fix the tarp to ground if you’re using it. Use a paracord to reinforce the tarp in between anchor points. It should be lying on the windward side. if you need 8 feet width and 5 feet height for your shelter, go for a 30-degree angle tarp.
Finally, you need to gather some small branches. It needs to be thinner than the backbone ones. It will become the side of your structure once you make it. The ones that are extending from the backbone branch to the ground are what you will need.
Also, to use as insulation, get a lot of old leaves. To hold the insulation in place you can use small branches as well as twigs. Just make sure the branches are similar in size. Stacking the branches, you will get a solid wall that won’t have holes or cracks causing problems.
As soon as you gather all the necessary materials, clean the ground. You need to level the area as well before making shelter.
3. Go for a Suitable Assembly.
To understand how to build a lean to roof you’ll need to know about proper base branch placement. So, pay attention. It’s time to tie the backbone onto its place. To tie the one end of base branch to each tree, you should use a rope or twine.
The tying needs to be secure and tight. Now use your shoulder for support and put the base branch’s end across tree. It should follow the height of your shoulder for laying. Now use the twine to drape around end of base branch.
You want to bend it and make a 90-degree angle. Then continue with draping it around the tree. Now you need to clasp this twine in 90 degrees and drape around the branch again. Before you finally drape it around the tree, keep on repeating this step.
The twine draping around tree and branch will shape like a square. Once the base branch seems secure in its place, go for the other end as well. The base branch should be making a straight line between both trees by end.
Now let the tiny branches lean against the base branch. You need to make a 45-degree angle here with the ground. Until you get a strong wall, keep on adding the tiny branches. The lean-to will start taking a shape as you continue. And it should look like a small shelter. There should be no gap between the branches. So, when leaning the branches make sure those are close enough. This will keep rain and cold outside.
Now you need to coat with leaves that will cover sides. Simply add the leaves over small branches. The leaves will play as insulation to make it warm. You should wear some good gloves while ding this process. Use small branches and twig to hold the leaves in place.
4. Test If It Works
Time to test whether it works or not. However, you’ve just made a lean-to that will play as a shelter as there’s a roof on top. Simply lay the padding or sleeping bag you have. Then wear some light layered cloths. You can lay down and check whether the inside feels comfortable or not. These shelters are a temporary survival structure in the wilds. So, in case of extreme rain or cold, don’t expect these to help a lot.
5. If You Want to Keep It Warm.
To keep yourself warm enough, building a fire trench can be a good idea. For that, you need to determine the perfect position of this trench. Simply lay down inside and let your arms stretch out as far as possible. The area where your hands are touching without rolling is where fire trench needs to be.
The best location is around 3 to 4 inches from lean-to. It needs to be at a safe but useful distance. So that you don’t feel like it’s too far to provide warmth. Also, it should not be extremely close to the point that there’s a chance of you rolling over and burning yourself. Here’s how you can make a fire trench.
The trench needs to be half or third of your body structure. Dig it down with 8 inches of depth. On the rear side, next, you need to make a fire reflector. Use rocks to make it. You can also use green pine branches. Make a 4-inch wall with the rocks by stacking. The created wall must pass your shoulder when you’re laying down.
It needs to be around one inch far from the back edge of trench. If you use green pine branches, you’ll need two poles. Place these poles on two places in the ground that is 3 inches from trench’s back edge. Then start stacking the branches behind poles for creating a 3-inch height structure that is just above your shoulder.
To hold the branches in place, use more poles at backside of this wall. Once you are done digging trench and building reflector, time to light the fire. Gather some materials such as kindling, firewood, or even tinder bundles. Something that will keep burning for a good amount of time, you should be gathering such materials.
Outdoor Speak: Keeping yourself warm is the key to your enjoyment and proper thermal maintenance so that you won’t get sick as the days pass. There is one brand of outdoor wear that might tickle your fancy — Why Is Northface Expensive.
Tips to Keep in Mind
When collecting leaves, make sure to check for bugs. Or else these will bite you later. You can also keep some insect repellent for such situations. Leaves are good to use when there’s no tarp with you. But try your best to not skip tarp as this will provide better sheltering, proper insulation, and also prevention from bugs. For indoor uses, pallets are not a very ideal option. But to make outdoor lean to shelter, these come very handily. You can also use plywood to wrap the foundation and get a flat floor surface.
Outdoor Speak: Living in a camper or trailer van is fun and exciting! There are times, however, when you would prefer to spend more time outside and interact with nature and other people. This is especially true when it comes to dining. Learn how much it costs to splurge on fine food — Golden Corral Cost.
Watch This!
Conclusion
And that’s how to build a lean to shelter. These are for sure a fantastic option to think about when you are planning to stay unmoved from a certain location. Just make sure you pay enough attention to prevailing winds. Also, take good measurements for creating better layers of roofing. That way you’ll end up having the right snug, dry and warm shelter to stay without any problems.